To generate a Certificate Signing Request (CSR) for Citrix Netscaler, a key pair must be created for the server.
These two items are a public key and a private key pair and cannot be separated. Like all key pairs the private key once created will remain on the system where the CSR is made. The CSR public key is what you will submit to a Certificate Authority (CA) to get the public key signed.
To generate a CSR on Citrix Netscaler 10 & 10.5 perform the following.
Step 1: Generating your private key:
- Log on to the NetScaler appliance.
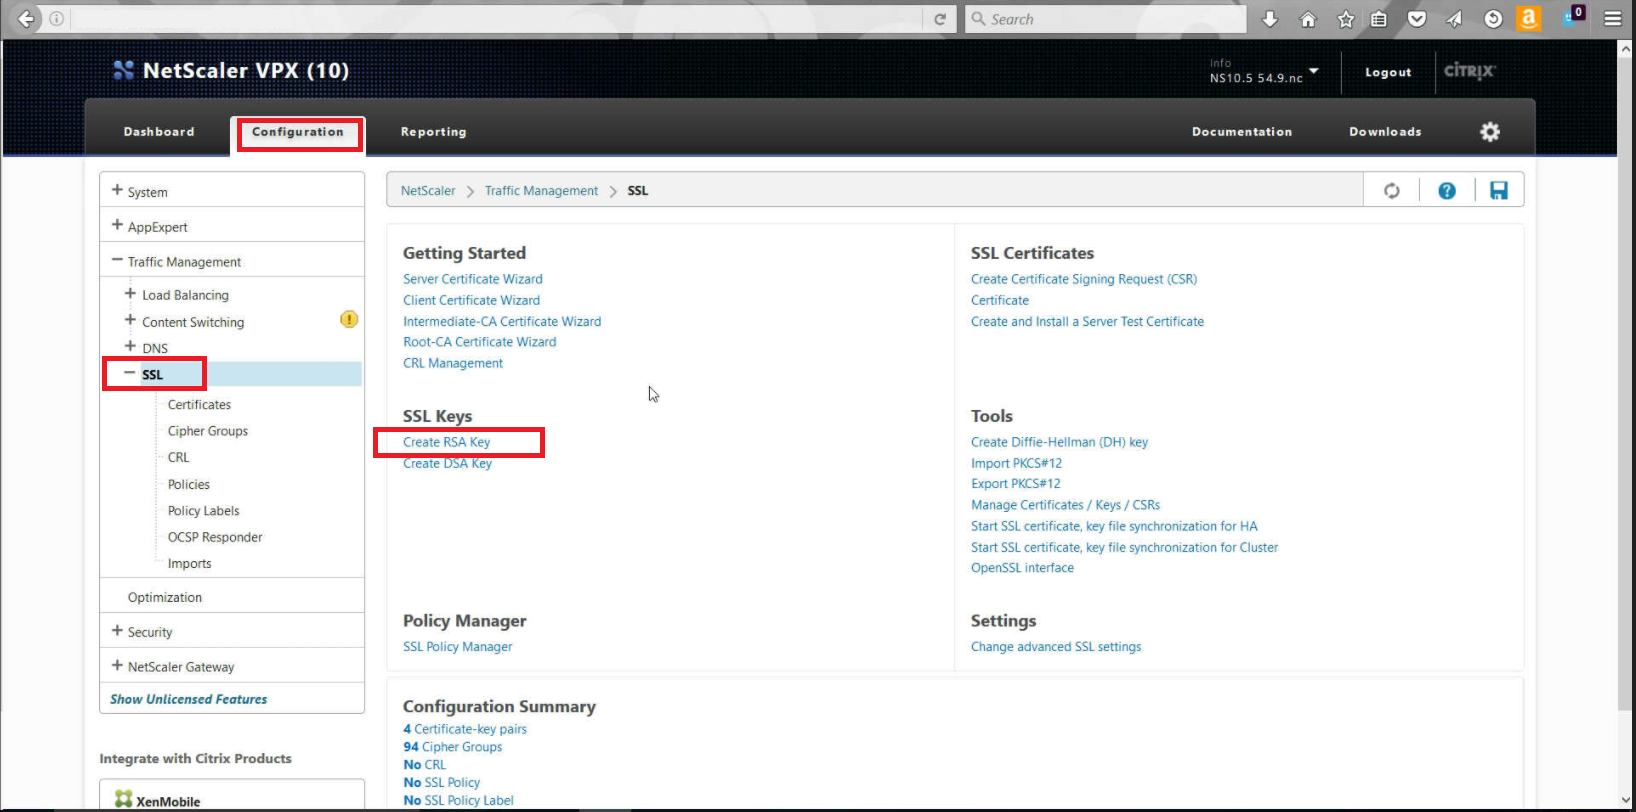
- Under the Configuration tab select SSL in the navigation pane.
- Under SSL Keys click Create RSA key.
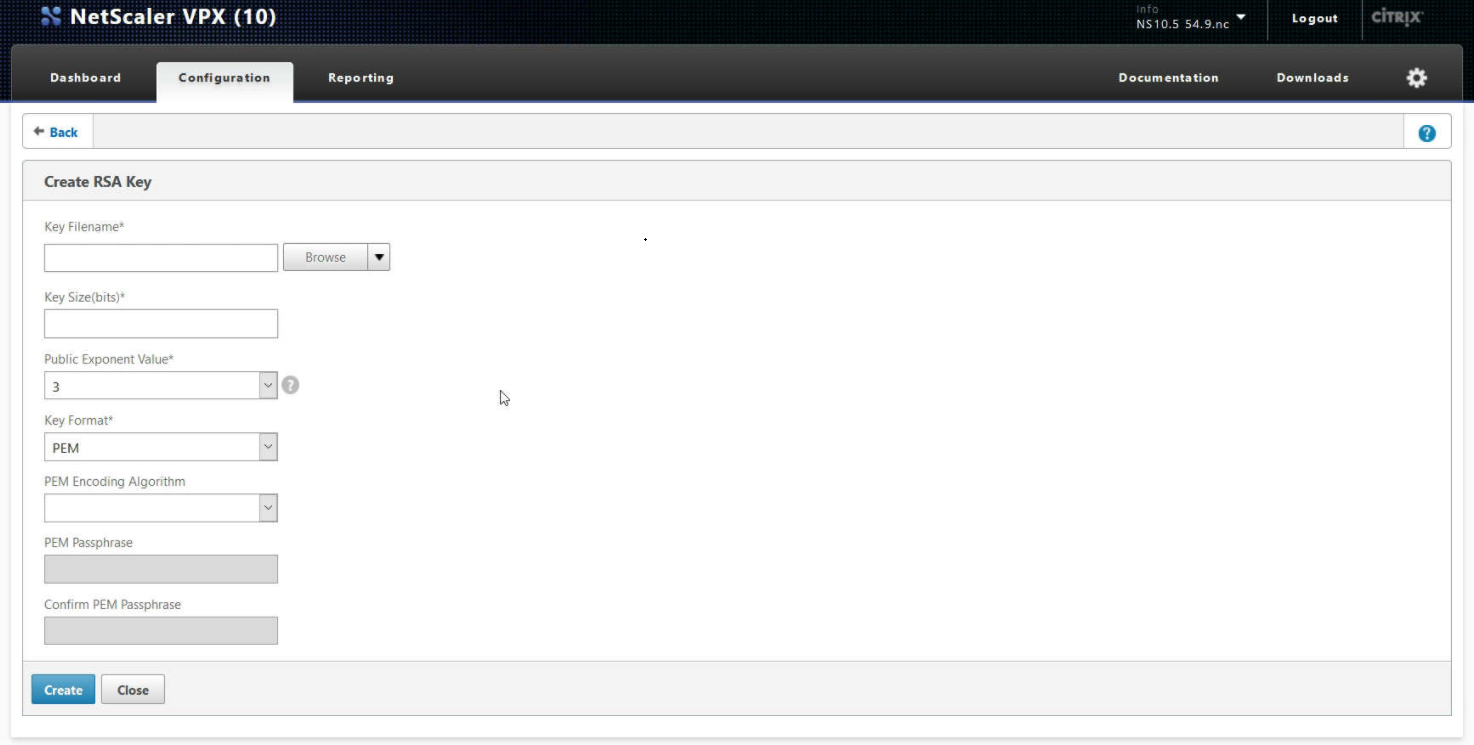
- Under Key Filename* specify the file name to your private key file.
Note: If you click browse you can choose the location and file path you want this private key file saved. The default directory is /nsconfig/ssl. This is the private key you will generate your CSR from. - Under Key Size (bits)* specify 2048 bits.
- Ignore Public Exponent Value*.
- Select PEM.
- Under PEM Encoding Algorithm Select the algorithm (DES or DES3) that you want to use to encrypt the RSA key.
Note: If you leave this box blank, you are not required to enter a passphrase. - Under PEM Passphrase* specify a password to protect your private key.
Note: You will need to remember this passphrase for CSR creation and later installation of the server certificate after it has been issued. - Verify your passphrase.
- Click Create.
Step 2: Creating your CSR:
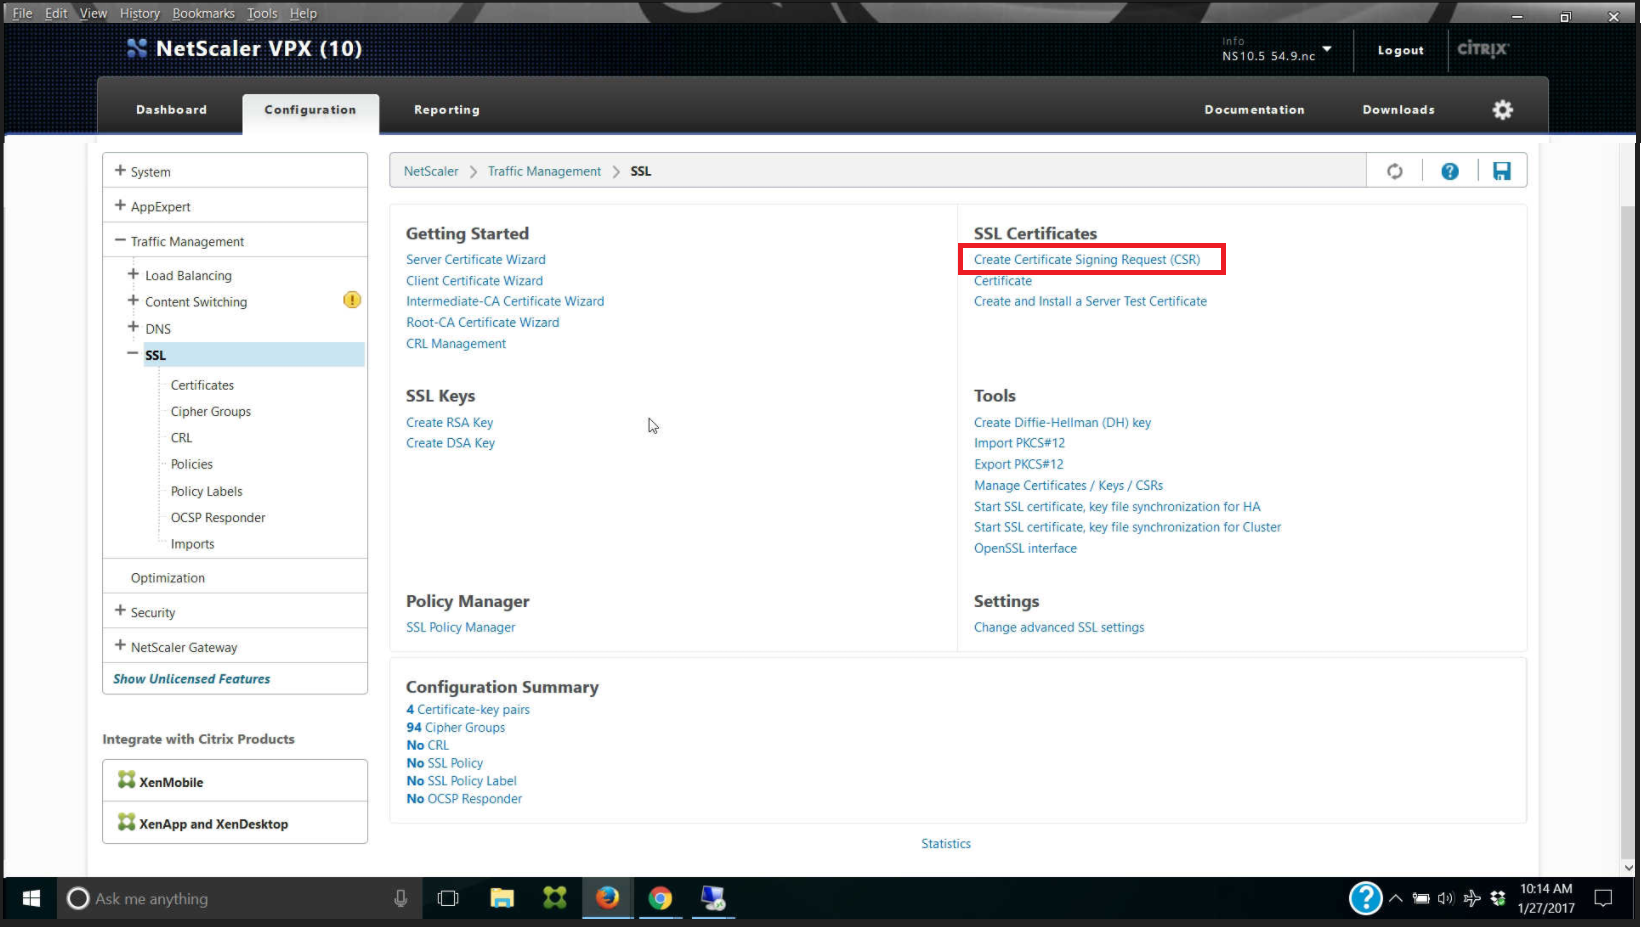
- Back in Configuration > SSL and under SSL Certificates Click Create Certificate Request.
- In the Create Certificate Request page window, under Request File Name specify the filename of your CSR file.
Note: If you click browse you can choose the location and file path you want this CSR file saved. The contents of this file is what you will copy and paste into the enrollment field when getting an SSL/TLS certificate. - In the Key File Name field click Browse and select the private key file you created in Step 1.
- Under key format select PEM.
- Under PEM Passphrase enter a passphrase if you created one in Step 1.
Note: If you did not associate a pass phrase with your key during step 1 then you can ignore this. - In the Distinguished Name Fields specify the information as it applies to your organization.
- Country: In the drop-down list, select the country where your company is legally located.
- State or Province: Enter the state or province where your company is legally located.
- Organization Name: Enter your company’s legally registered name.
- City: Enter the city where your company is legally located.
- Email Address: (Optional) You can leave this box blank.
- Organization Unit: Enter the department within your organization that you want to appear on the SSL Certificate.
- Common Name: Enter the fully qualified domain name (FQDN) For example: www.yourdomain.com
- Under the Attribute Fields
- Challenge Password: Ignore this option. Associating a passphrase to your CSR will encrypt it and you will be unable to enroll with this during submission to a CA.
- Company Name: (Optional) Enter your company name.
- Click Create.
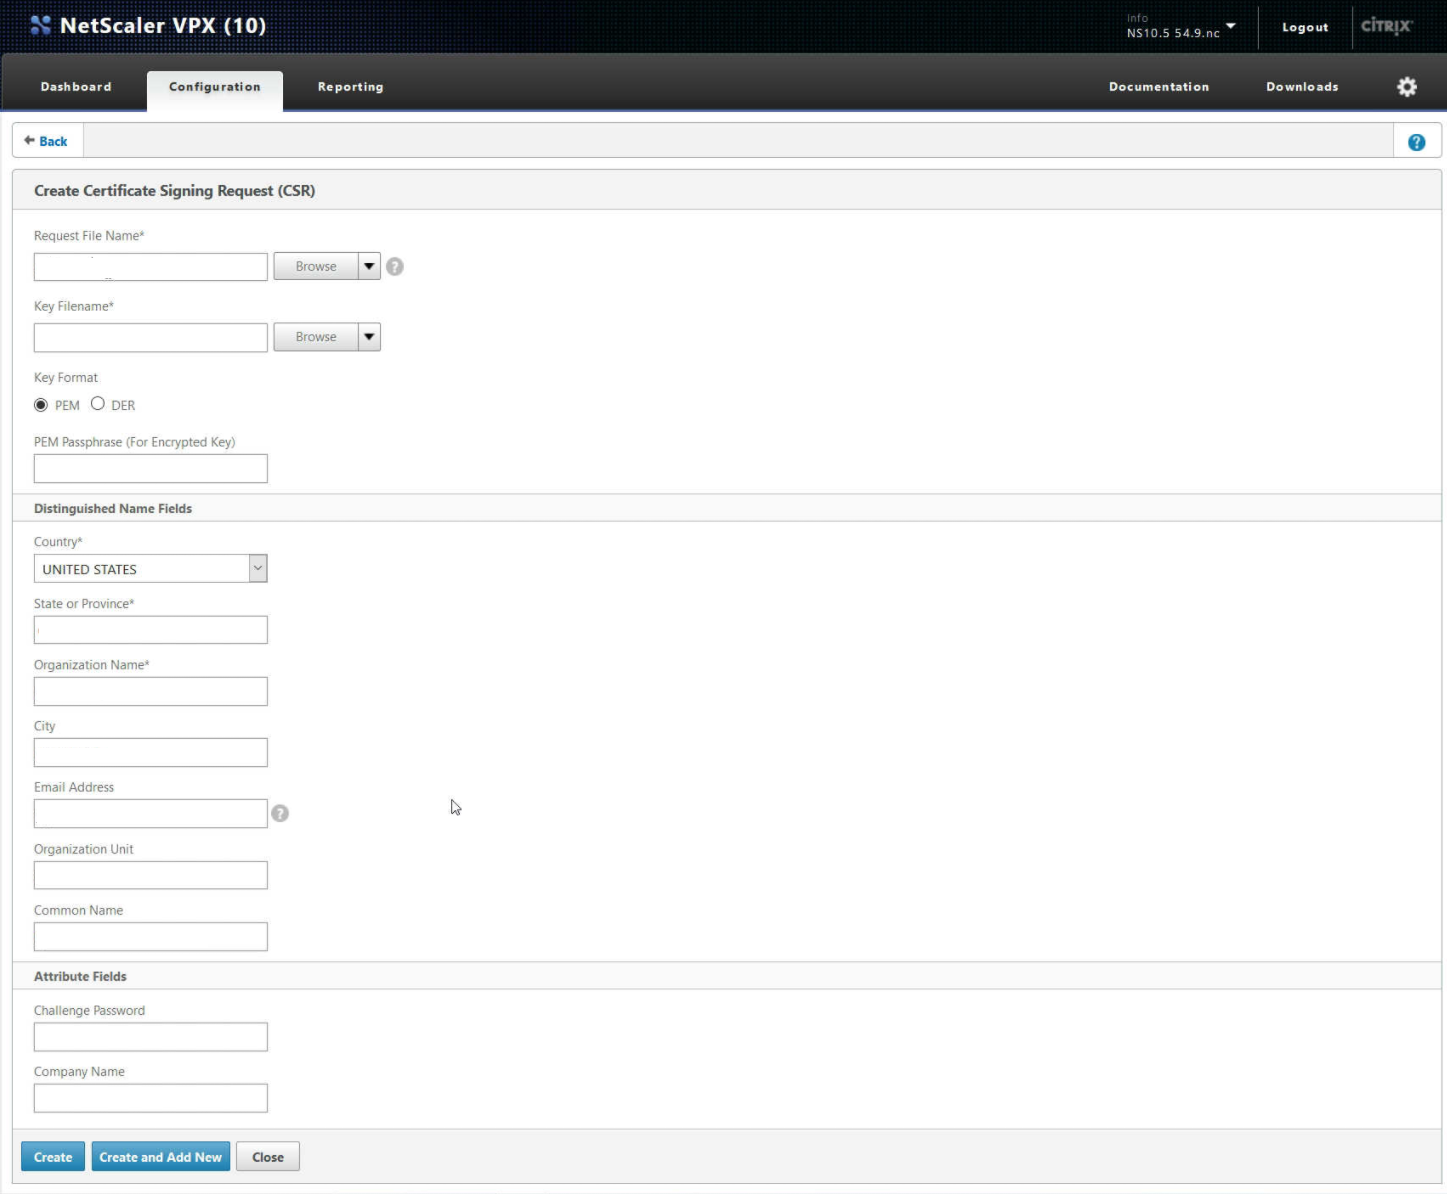
You have created your private key and CSR.
Step 3: Retrieving your CSR for enrollment:
Typically you will see a green heading after your CSR has been created for easy retrieval. You can also pick it up by the following… Alternatively you can always go to the file & location where you saved this CSR file.
- Return to the NetScaler console, on the Configuration tab, in the tree menu, expand Traffic Management and then click SSL.
- Under Tools, click on Manage Certificates / Keys / CSRs, select your CSR or request file (i.e. www.yourdomain.csr) and then click View.
- In the your “CSR” window, copy the entire CSR code, including the —–BEGIN NEW CERTIFICATE REQUEST—– and —–END NEW CERTIFICATE REQUEST—– tags.
Note: The default directory is /nsconfig/ssl. You will paste the contents of this file into your enrollment portal.
Congrats you have just created a Citrix key, and a CSR for your Citrix system.
If you are unable to use these instructions for your server, Acmetek recommends that you contact either the vendor of your software or the organization that supports it.
Citrix Support:
For more information refer to Citrix.
For Citrix Netscaler 10+ SSL/TLS install instructions click here