The Digicert Certificate Utility is probably one of the best certificate management tool out on the net.
A lot of people become scared with key-pair encryption but key-pairs/certificates are actually fundamental easy to figure out. Unlike SSL certificates, code signing certificates perform the function of signing. Code signing certificates creates a tamper proof digital shrink wrap of your application software files and denotes to those who download or install the application who created/published it.
Although Some Certificate Authorities my separate their code signing Products and have different ways to Enroll and Install. The Digicert Certificate Utility is cross platform meaning your can signing the following files with the same certificate. .exe, .cab, .dll, .ocx, .msi, .xpi, .xap, windows kernel-mode. Java. jre and Adobe Air
- Sign or re-sign code or software
- Create a CSR from your system (optional)
- Sign applications with a single click
- Sign drivers and other system files
- Verify signed applications
- Time stamp applications
- Repair private key errors
- Automate application signing
Things to know:
- The Digicert Certificate Utility Code Signing Automatically refers to Microsoft user account certificate stores on the system. Some Certificate Authorities (CA) will use or request Internet Explorer for certificate enrollment and installation. Digicert will automatically pick up the certificate and import it into its code signing store if this is the case.
- If a CA requests you to use Firefox for enrollment and pickup of your code signing certificate you will then need to Export the certificate from the Firefox browser you used and then import it into the utility for instructions on Exporting from Firefox see our article How to export certificate from Firefox.
- If you have a EV Code Signing Certificate that is installed on a token you must have the token plugged in when using the Digicert Certificate Utility.
For a comprehensive Guide to this tool Check our article Digicert Certificate Utility – Code Signing (Guide)
Option A – Importing your Code Signing Certificate Through The Digicert Utility:
- Run the Digicert Certificate Utility by Double-clicking the DigicertUtil.exe.
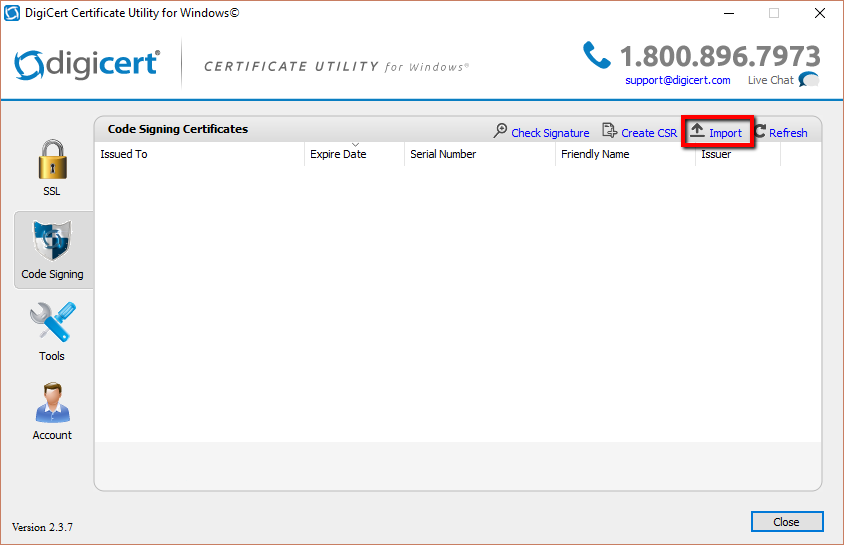
- In the Digicert Certificate Utility, Click Code Signing.
- Select the certificate that you want to export and then click Import.

- In the Certificate Import window specify the location and path of your code signing Certificate p12/pfx file clicking Browse..
- After opening to the location of your p12 file, Click Next.
- Enter the password your specified during the creation of your code signing p12/pfx file.
- If the password was entered correctly you will be forward to a summary screen with the certificates information. Click Finish.
- You will receive a message stating that your certificate has been successfully imported.
Congrats you now have your code signing certificate imported into the Digicert Utility for easy code signing and management of your certificate.
For instructions on how to now sign your code using the Digicert Certificate Utility see Digicert Certificate Utility – Code Signing (Signing Code)
Option B – Importing Your Code Signing Certificate Though Windows:
Since the Digicert Certificate Utility refers to the windows user Personal certificate store for code signing you can import your code signing pfx/p12 into the utility by performing the following if your code signing certificate is not already installed on the system.
Note: Importing your code signing certificate into the Digicert Certificate Utility pertains to non EV code signing certificates. If you have a EV code signing token you will have to plug it into the workstation and the utility should automatically recognize it.
- Move a copy of your code signing certificate to the desktop workstation.
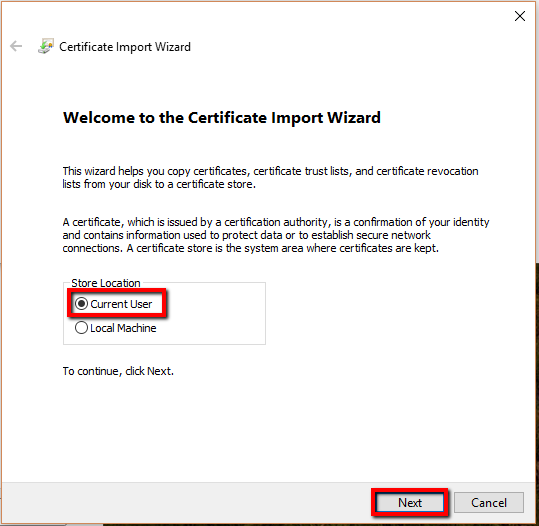
- Double click on your .pfx or .p12 code signing certificate file. This will bring up the Windows Certificate Import Wizard.
- Make sure that Current User is selected.
- Click Next.

- On the File to Import page, the location and path of your pfx/p12 certificate file should be specified otherwise click Browse… to specify the location and path of your certificate pfx/p12 code signing file.
- Click Next.

- On the Private key protection page, enter the password that you created when you exported your code signing certificate. Check Mark this key as exportable…
- Check Include all extended properties.
- Click Next.

- On the Certificate Store page, select Automatically Select the certificate store based on the type of certificate.
- Click Next.

- On the Completing the Certificate Import Wizard page, Review the details and then click finish.
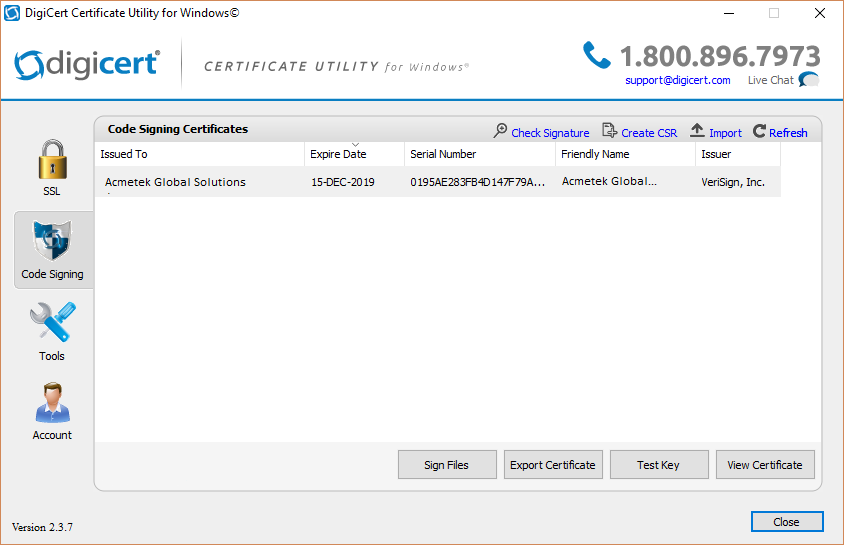
- After importing your code signing certificate to the Certificate Store you should now be able to see your code signing certificate within the Digicert Certificate Utility.
- Run the Digicert Certificate Utility for Windows by Double-click the DigiCertUtil.exe
Note: If you already have had the certificate utility open then click Refresh to have it pop up.

Congrats you now have your code signing certificate imported into the Digicert Utility for easy code signing and management of your certificate.
For instructions on how to now sign your code using the Digicert Certificate Utility see Digicert Certificate Utility – Code Signing (Signing Code)
