To generate a Certificate Signing Request (CSR) for Windows Lync 2013 you will need to create a key pair for your server the public key and private key. These two items are a digital certificate key pair and cannot be separated. On Windows type systems PFX/PKCS12 requests are made, and are stored on the system. The private key will remain hidden on the windows system where the CSR request is made.
To generate a CSR on a Lync 2013 system perform the following.
Step 1: Generating your CSR:
- From the start menu click on the Lync Deployment Wizard.
- Click Install or Update Lync Server System.
- Under the Request, Install or Assign Certificate section click Run.

- Select External Edge Certificate and click Request.

- Click Next.

- Select Prepare the request now, but send it later (offline certificate request).

- Click on Browse to specify a location and path of your choice to save your CSR.

- Click Next.
- On the Specify Alternate Certificate Template click Next.
- Enter a friendly name for your new certificate.
- From the Bit Length drop down select 2048.
- Select Mark the private key as exportable.
Note: If you do not select this feature you will not be able to export/migrate your certificate with its private key if you have multiple machines that require it. - Click Next..
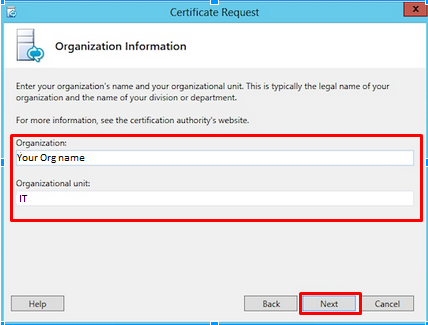
- Under Organization specify the legal name of your Organization.
- Under Organizational Unit specify the sub department of your organization. (Example: IT)
- Click Next

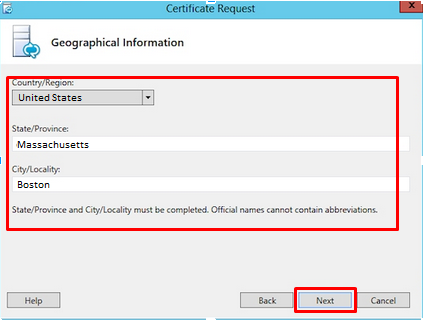
- Under the Country/Region drop down select your country.
- Specify the legal State/Province, and City/Locality of your organization.
- Click Next.

- The Subject Name and Subject Alternative Names will auto populate. Click Next.
- Check the box on SIP domains.
Click Next.

- On the Configure Additional Subject Alternate Names page specify other SANs needed. Click Next.
Note: If Additional SAN names need to be added to the SSL certificate, this will need to be done during the enrollment process. - On the Summary Page ensure the information is correct, and click Next.
- On the Executing Commands page ensure the Task Status is completed. Click Next.
- On the Certificate Request File page you can click view the CSR to then copy and paste it into an enrollment portal, alternatively it is saved to the location and path you specified earlier in the CSR creation.
- Click Finish to close the Certificate Request File window.Your CSR request has been created and is ready for you to copy and paste its contents into the enrollment portal.
If you are unable to use these instructions for your server, Acmetek recommends that you contact either the vendor of your software or the organization that supports it.
Microsoft Support:
For more information refer to Microsoft.
SSL Certificates for Microsoft Lync can be purchased at Acmetek.com
For Lync SSL Certificate Installation click here.


