Cisco Wireless LAN Controller (WLC) is a very custom environment initially when generating your CSR and preparing your Server Certificate after it has been issued. Below are generalized instructions. If you have a custom installation, you will need to adjust these instructions appropriately. Cisco WLC is quite complicated during its initial set up of the keypair and Cisco has created a help video located here to help their WLC users.
Like the majority of server systems you will install your SSL certificate on the same server where your Certificate Signing Request (CSR) was created. Your private key will always be left on the server system where the CSR was originally created. Your SSL certificate will not work without this private key file. We will assume that this is the original system.
To install your SSL certificate on Cisco WLC perform the following.
Step 1: Downloading your SSL Certificate its Intermediate CA and Root certificate:
For a Complete installation of your Server certificate on your Cisco WLC you will need three things. Your Server Certificate, Its Intermediate CA, and its Root Certificate. You will create a master all-certs.pem file that will need to be converted into a .pfx file with the private key that was created during CSR creation.
- If you had the option of server type during enrollment and selected Other you will receive a x509/.cer/.crt/.pem version of your certificate within the email. Alternately you can access your Certificate User Portal by the supplied link in the email to pick up the x509 version of your certificate.
- On your computer operating system open a standard text document or notepad. For example you can right click on your desktop on windows go New and select Text Document.
- Copy the SSL certificate and make sure to copy the —–BEGIN CERTIFICATE—– and —–END CERTIFICATE—– header and footer Ensure there are no white spaces, extra line breaks or additional characters.
- If your intermediate CA certificate for your product is not in the body of the email you can access your Intermediate CA also in a link within that email typically or contact your CA for Support. Getting your Root CA will vary and you may have to consult your CA in order to get this. Click here to see a list of intermediates and roots the SSL Support Desk has on file.
- Copy and paste the contents of your Intermediate and root certificate into the same Notepad/Text Doc of your Server Certificate. You should have one file that looks like this and saved with what ever name you like with a .pem extension.
Note: Some CA’s may give you an apache intermediate bundle. This will consist of two intermediates stacked on top of each other. These two intermediates are to be kept together and inserted into the example below when making your master all-certs file for installation.
——BEGIN CERTIFICATE——
*Server Device/SSL cert*
——END CERTIFICATE——
——BEGIN CERTIFICATE——
*Intermediate CA cert *
——END CERTIFICATE——–
——BEGIN CERTIFICATE——
*Root CA cert *
——END CERTIFICATE——
Step 2: Combining your Master cert .pem file with private .key into .pfx and them back to a .pem:
You now need to combine your Master all-certs.pem file with the private key that you generated back during CSR generation privatekeyfilename.key. into a single .pfx file and then once your all-certs.pem and .key file are merged convert it back into a .pem again…
- Move your two files into the folder where OpenSSL.exe resides
(typically C:\Program Files\GnuWin32\OpenSSL\bin\):
• privatekeyfilename.key
• all-certs.pem - Open OpenSSL (via Command Line) and execute the following commands (in one line).
openssl>pkcs12 –export -in all-certs.pem -inkey privatekeyfilename.pem –out all-certs.p12 -clcerts -passin pass:check123 -passout pass:check123
openssl>pkcs12 –in all-certs.p12 –out final-cert.pem -passin pass:check123 –passout pass:check123
Note: In this command, you must enter a password for the parameters –passin and -passout. The password that is configured for the -passout parameter must match the certificate password parameter that is configured on the WLC. In this example, the password that is configured for both the -passin and -passout parameters is check123.You should now have a .pem file that will need to be moved and downloaded into your WLC
Step 3: Uploading your certificate to the WLC:
- Login to your WLC via the Web GUI, and choose the following path:
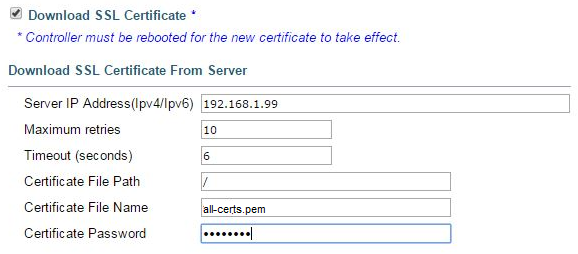
Web GUI > Security > Web Auth > Certificate: Check the box: Download SSL Certificate. - In the File Path field, enter the directory path of the certificate.
- In the File Name field, enter the name of the certificate.
- In the Certificate Password field, enter the password that was used to protect the certificate.
- Click Apply.

- After the download is complete, choose Commands > Reboot > Reboot.
- If prompted to save your changes, click Save and Reboot.
- Click OK in order to confirm your decision to reboot the controller.
If you are unable to use these instructions for your server, Acmetek recommends that you contact either the vendor of your software or the organization that supports it.
Cisco Support:
For Cisco Support on WLC click here


