Both Apache and F5 uses x509 pem/crt certificate files for its configurations. You will follow these steps to copy, move and import your files from Apache to F5 system.
Apache systems are very customizable. The directory location and naming of the individual files needed vary depending on your personalized system. Below are generalized instructions. You will have to apply these examples to your own environment.
We will start by assuming that you have already successfully installed the SSL certificate on one Apache web server.
Step 1: Finding/converting your SSL certificate and key file on Apache:
- Referencing the httpd.conf or ssl.conf file on the Apache system look for the location and directories of the three files necessary on the Apache system that has the installed SSL certificate. “Of course remember your naming’s of these files and their directories MAY differ”
- SSLCertificateFile /usr/local/ssl/crt/public.crt
SSLCertificateFile tells Apache how to find the the SSL certificate file. - SSLCertificateKeyFile /usr/local/ssl/private/private.key
SSLCertificateKeyFile tells Apache how to find the private key file.
- SSLCertificateChainFile /usr/local/ssl/crt/intermediate.crt
SSLCertificateChainFile or SSLCACertificateFile tells Apache the location of the Intermediate file.

- SSLCertificateFile /usr/local/ssl/crt/public.crt
- Copy these three files and back them up on a removable media USB drive or an alternate drive directory that can be accessed by the F5 system you are moving to.
Step 2: Importing your SSL certificate, Intermediate, and Private key on your F5 BIG-IP system:
You will perform the next steps in the process on the second F5 BIG-IP system.
- Importing your SSL Certificate:
- On the Main tab of the navigation pane, expand Local Traffic, and click SSL certificates. This displays the list of certificates installed on the system.
Note: Some Big IP systems may have this as its navigation instead Navigate to System > File Management > SSL Certificates List. - In the upper-right area of the screen, click Import.
- From the Import Type list, select Certificate.
- For the Certificate Name setting, click Create New.
- In the Certificate Name box, type the name for the certificate.
- From the Certificate Source setting, click either Upload File or Paste Text. If you click Upload File, type a file name or click Browse and select the file.
- On the Main tab of the navigation pane, expand Local Traffic, and click SSL certificates. This displays the list of certificates installed on the system.
- Importing your Private key:
- Back under SSL certificates in the upper-right area of the screen, click Import.
- From the Import Type list, select Key.
- For the Key Name setting, click Create New.
- In the Key Name box, type a name for the key.
- From the Key Source setting, click either Upload File or Paste Text. If you click Upload File, type a file name or click Browse and select the file.
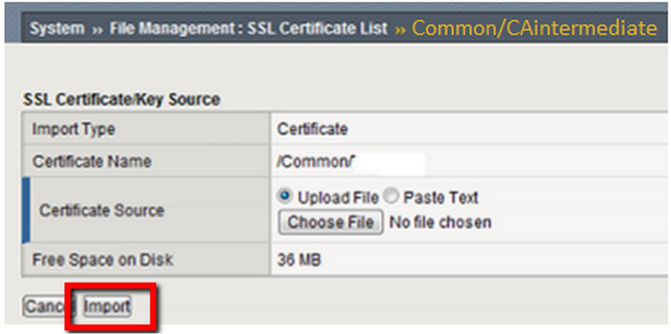
- Importing your CA Intermediate Certificate:
- Back under SSL certificates in the upper-right area of the screen, click Import.

- Under Import Type, choose Certificate, then Create New.
- Specify a name for this intermediate CA.
- Browse to the Intermediate CA .crt file that you created from step 1 of these instructions, click Open. Alternatively you can also paste the Intermediate CA into the field it provides by selecting Paste Text.
- Click Import.

- Back under SSL certificates in the upper-right area of the screen, click Import.
Step 3: Configuring the your Loadbalancer:
- Create or open the SSL profile that you will be using with the SSL certificate.
- Click on Advanced from the drop-down menu, under the Configuration window.
- Select the new SSL certificate public/private key pair.
- Under the Chain section, browse for the intermediate CA certificate and click on Save and Exit.
Your F5 BigIP loadbalancer is now configured with your SSL certificate
If you are unable to use these instructions for your server, Acmetek recommends that you contact either the vendor of your software or the organization that supports it.
F5 Support
For more information reference F5


