Portecle is a user friendly GUI application for creating, managing and examining keystores, keys, certificates, certificate requests, certificate revocation lists and more.
The scenario for using such a tool is if a server system lacks the capability of generating a CSR keypair on its own. Another Senario would be if large networks of multiple server types, data centers and such are faced with a CSR keypair on one system environment and the tireless key store conversions that are required to import a keypair into a different server environment, which can be very time consuming and frustrating.
Portecle eliminates the need for a server to create a CSR keypair. It acts as keypair CSR generator where you can generate a single key pair, create a CSR, import a Signing SSL certificate, convert and save different format types of this key pair, and migrate them into the various systems required.
Portecle can be used to, for example:
- Create, load, save, and convert keystores.
- Generate DSA and RSA key pair entries with self-signed X.509 certificates.
- Import X.509 certificate files as trusted certificates.
- Import key pairs from PKCS #12.
- Clone and change the password of key pair entries and keystores.
- View the details of certificates contained within keystore entries, certificate files, and SSL/TLS connections.
- Export keystore entries in a variety of formats.
- Generate and view certification requests (CSRs).
- Import Certificate Authority (CA) replies.
- Change the password of key pair entries and keystores.
- Delete, clone, and rename keystore entries.
- View the details of certificate revocation list (CRL) files.
Appendix:
Downloading and implementing:
- Downloading Java (If Needed)
- Downloading Portecle
Using the Portecle Java Application
Getting Started:
- Create a new Keystore
- Creating a Keypair
- Saving a keystore
- Generating a CSR
- Setting a new password for you keystore
Importing and configuring:
- Installing your SSL certificate
- Importing an Intermediate CA or “Trusted Certificate” into your Keystore.
How to convert keystore:
- Jks keystore converted to pkcs12/.pfx/.p12 keystore or vise versa
- Converting your Keystore to Apache .cer/.pem/.crt and .key files
Downloading and Implementing
Downloading Java (If Needed):
- Portecle is a java based application and you must have java installed for it to run. If you do not already have java downloaded click

- Click Agree and Start Free Downloading.
- Download will begin,
- Open the JavaSetup.exe that you just downloaded to install.
- At the Java Setup installer click Install.
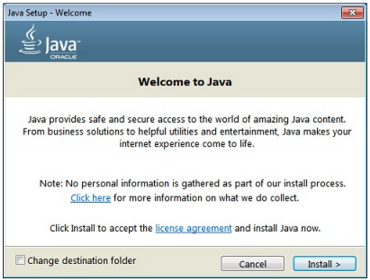
- After Installation click Close.
Downloading Portecle:
- Portecle can be downloaded from Sourceforge by clicking HERE
- Click Download.
- The portecle.zip will be downloaded.
- Right click on the compressed portecle.zip folder and select Extract All… to extract all files to a location of your choice.

- In the extracted portecle folder click on the portecle.jar to open the Portecle java executable jar file application.

- Note: Depending on your you environment on your system you may need to right click the portecle.jar file and choose open with.. and Select Java(™) Platform
Using the Portecle Java application:
Gettings Started:
Note: When navigating portecle, in the lower left of the application you will typically find information pertaining to the keystore, or information pertaining to its functions when mousing over those functions.
Create a new Keystore:
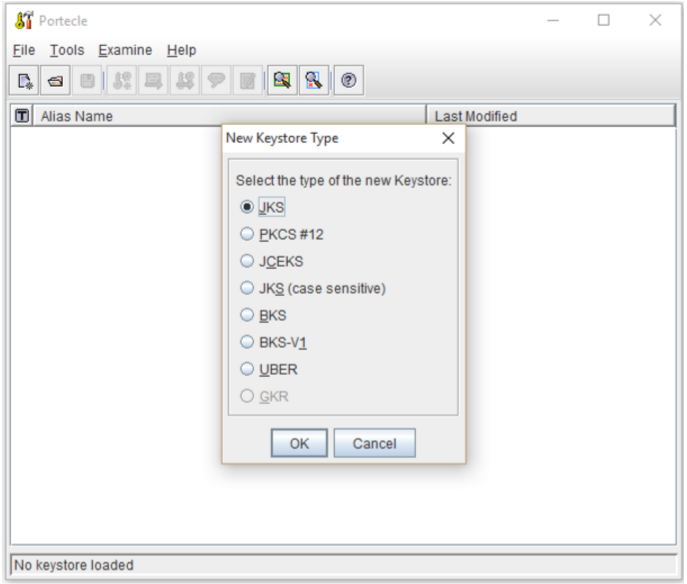
- From the File menu, choose New Keystore. Alternatively click on the New Keystore toolbar Icon button:
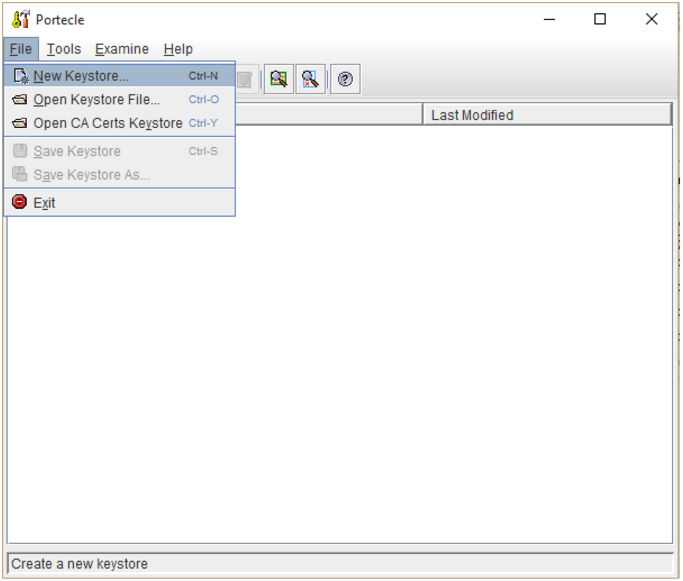
- The New Keystore Type dialog is displayed. Select the desired keystore type to generate your keypair.
Keypair Types:- Major ones:
- JKS = Java Keystore used by Tomcat, Keytool, and Java codesigning.
- PKCS#12 = Used by Windows systems such as IIS/Exchange, and other Windows based applications.
- Lesser ones:
- JCEKS = Java Cryptography Extension Keystore (More secure version of JKS)
- JKS (case sensitive): Case sensitive JKS
- BKS = Bouncy Castle Keystore (Bouncy Castle’s version of JKS)
- UBER = Bouncy Castle UBER Keystore (More secure version of BKS)
- GKR = GNU Keyring keystore (requires GNU Classpath version 0.90 or later installed)
- Major ones:
- Press the OK button.
- The title bar will change to display the text Untitled and the status bar will change to display the chosen keystore type.
- Saving your keystore will change the Untitled to whatever you name you choose specify for your keystore.
Saving a keystore:
From the File menu, choose Save Keystore. Alternatively click on the Save Keystore toolbar icon button: ![]()
- If the keystore is not Untitled then it will be saved immediately. Otherwise…
- If you have yet to set a password for your Untitled keystore:
- The Save Keystore As dialog is displayed.
- Select the folder where the keystore file is to be saved.
- Type the filename into the File Name text box.
Note: For easily accessing your keystores add the extension to your file name based on your keystore type.
Example:- jks keystore File Name: mydomain.jks
- pkcs#12 keystore File Name: mydomain.pfx
- Click on the Save button.
Creating a Keypair:
Before you can get a SSL certificate you will have to generate a Certificate Signing Request (CSR), and before you can generate a CSR you will have to generate a keypair .
- From the Tools menu, choose Generate Key Pair. Alternatively click on the Generate Key Pair toolbar icon button:

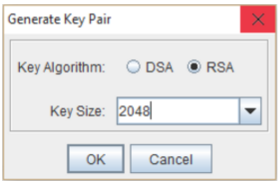
- The Generate Key Pair dialog will be displayed. Select a Key Algorithm and Key Size and press the OK button. Key pair generation will start in the background.
Note: Standards dictate that your keypair/CSR Must be at least 2048.
- The Generate Certificate dialog will be displayed.
- Specify the following information:
- Signature Algorithm: Leave as default SHA256 with RSA
- Validity (days): Leave as Default. If you enroll for a CA SSL Certificate this will be overridden depending on your enrollment for a SSL certificate.
- Common Name (CN): FQDN (fully-qualified domain name) of the server (e.g., www.domain.com, mail.domain.com, or for wildcard certificate *.domain.com). IP’s are not accepted for enrollment of a CA SSL Certificate
Note: If you want to generate a SAN/UCC (Multidomain Certificate) Portecle lacks the ability to add SANs into the keypair/CSR, BUT that does not mean you can’t get a Multidomain Certificate from a CA (certificate Authority). When enrolling for a SAN certificate from a CA they usually require you to specify the extra domains to add, regardless of what is on the CSR. Basically the CA will add those extra domains you require expanding the functionality of the certificate when it gets issued. - Organisational Unit (OU): A department name, such as ‘Information Technology’.
- Organisation Name (O): The full legal name of the organization.
- Locality Name (L): City where the Organization is located. do not abbreviate.
- State Name (ST): State, or Province where the organization is located. Do not abbreviate.
- Country Name (C): City, state, and country where the organization is located. Do not abbreviate.
- Contact Email (E): Your email.
- Click OK.

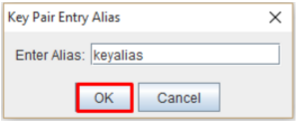
- The Key Pair Entry Alias dialog pop up will appear.
- Specify an alias of you choice for the private key.
Note: This alias will be used when you import your SSL certificate back into this keystore.
- The Generate Certificate dialog dialog will display noting the “Key Pair Generation Successful.” you will also see your private key under the specified alias name now in your keystore.
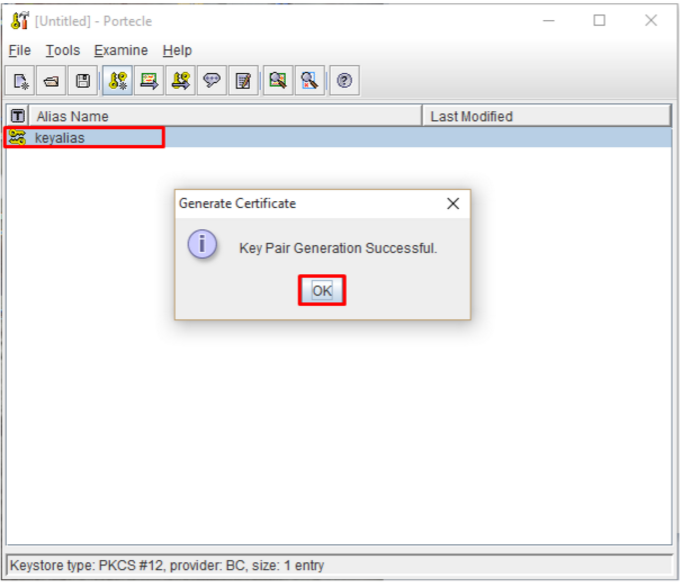
Congrats you have just generated a Private Key for your keystore.
Generating a CSR:
Now that your keystore and private key is now created you can now generate your CSR.
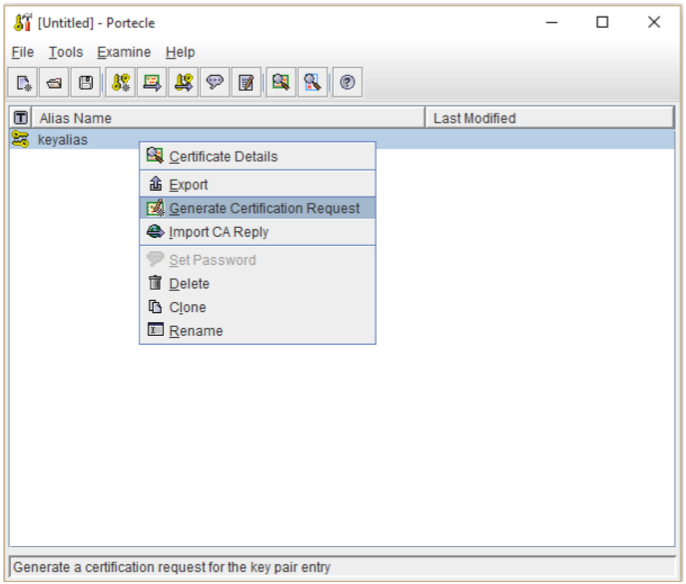
- Right click on your private key alias and select Generate Certification Request.
- Specify the location and path of where you will want to save this CSR file.
- Under File Name change the extension of the CSR request from .csr to .txt. This will save you some steps in submitting the CSR to the CA.
- Under Files of Type dropdown select All Files.
- Click Generate.

- A confirmation of a successful CSR generation will appear.
- You can now submit its entire contents when enrolling for your SSL Certificate from a Certificate Authority.
Congrats you have just generated your CSR from your Keystore.
Importing and Configuring:
Installing your SSL Certificate:
Now that your SSL certificate has been issued from the Certificate authority you will need to import it into your keystore. Any SSL certificate format will be accepted but If you received a pkcs#7/.pdb file from your CA you will not need to worry about installing an Intermediate CA. This format type has the Intermediate CA included in its formating.
- Right click on your private key alias and select Import CA Reply.
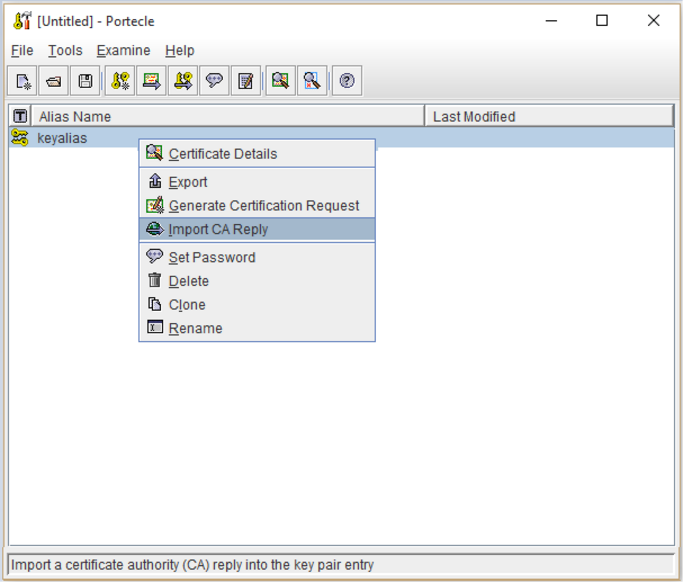
- Specify the location and path of your saved SSL certificate file that you received from your CA and click Import.
Portecle will attempt to match the reply’s root CA to an existing trusted certificate in your keystore
Note: If it cannot then the Certificate Details dialog will appear displaying the details of the reply’s Intermediate/root CA certificate for you to verify. - After viewing the details acknowledge the dialog by pressing the OK button.
- A further dialog will appear asking if you wish accept the certificate.
- Click Yes.
- Save your keystore.
Congrats you have successfully installed and configured your keystore. It can now be moved and imported wherever it is needed.
Note: When performing Import CA Reply you may receive a error. “Cannot establish trust for the CA reply. The import cannot proceed.”
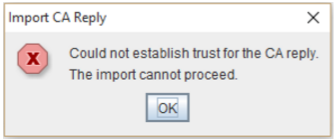
This error means that there is no trusted certificate to support the SSL certificate. This error usually appears when installing a x509/.cer/.pem/crt format certificate. In order to resolve this you must import your SSL certificates intermediate CA certificate first and then proceed to import the SSL certificate. See Instructions for Importing Intermediate CA or “Trusted Certificate” into your keystore.
Importing an Intermediate CA or “Trusted Certificate” into your keystore.
If you chose Other as your server type and received a SSL certificate (Something other than a Windows format) and got a x509/.pem/.crt/.cer format certificate then you will need to import the Intermediate CA certificate for you SSL certificate first. or else you will receive the error “Cannot establish trust for the CA reply. The import cannot proceed.” as described above. in Importing SSL certificate. To resolve this perform the following.
- From the Tools menu, choose Import Trusted Certificate. Alternatively click on the Import Trusted Certificate toolbar button:

- The Import Trusted Certificate dialog will appear.
- Select the folder where the certificate file is stored.
- Click on the required certificate file or type the filename into the File Name text box.
- Click on the Import button.
- A warning will appear shown below. This will happen. it’s just acknowledging to you that you need to manually confirm that this is a Trusted Intermediate CA.
- Click OK.

- The details of the Intermediate CA will appear.
- Click OK.
- Acknowledge that this is a trusted CA certificate by clicking OK.

- Under the Trusted Certificate Entry Alias specify an alias for the intermediate trust CA Any name will do.
- Click OK.
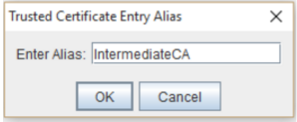
- Click OK.
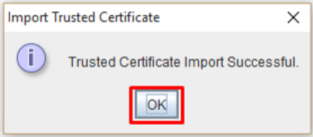
- Your intermediate should be imported successfully, and a new intermediate certificate should appear within your keystore with the chosen alias.
- Save your keystore.
- If you still need to install your SSL certificate go to Installing your SSL certificate section of this article.
How to convert Keystore:
Note: Portecle is for initial keystore manipulations. JKS and PFX keystores are a single file like a box that consists of mini certificates inside. These mini certificates can be pulled out and converted into single stand alone x509/pem certificates used in Apache type environments, but Portecle lacks the ability to take x509/pem from an apache environment and convert them into a jks/pfx keystore.
Converting your Jks keystore to pkcs12/.pfx/.p12 keystore or vise versa:
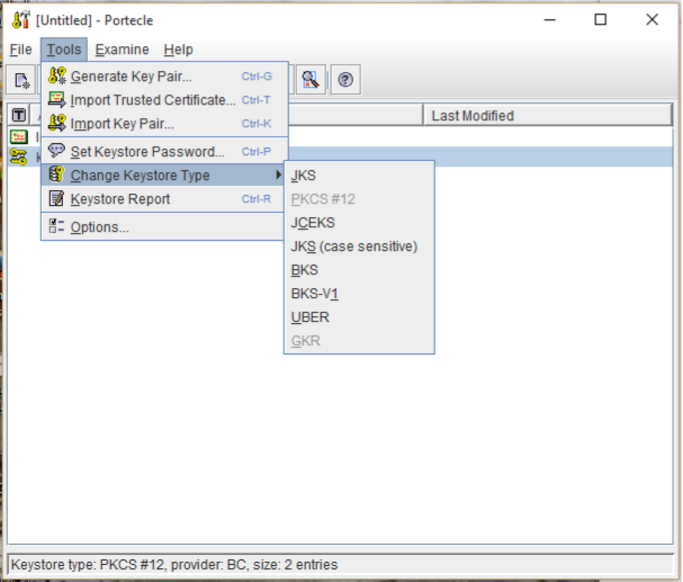
- From the Tools menu, choose the Change Keystore Type.
- In the Change keystore Type sub-menu select one of the available format types you want to convert to.
Note: you will not be able to convert a keystore into a format it is currently in.
- If you are converting your keystore from PKCS12 to JKS you may receive the pop you message below.

This simply means that the password for the new converted keystore will be by default set to password. You can change this password later. - Click OK.

- To change the password to something else instead of “password” perform the steps in Setting new password for keystore.
Converting your jks Keystore to Apache .cer/.pem/.crt and .key files:
Note: This conversion will associate a password to the private key. Not all systems want a password associated with the private key.
C-panel, WHM or other web hosted environments for example. Double check the hosted application you are attempting to import this converted private key (with password) into to see if it will accept private keys with password or not. Typically there will be an option that states something like “password“ when installing the private key on such systems.
Recommendation 1: It might be easier to just generate a new CSR from the hosted system perform a reissue of the SSL certificate and perform a import directly into that hosted system instead. It will save you steps and frustrations finding out that the conversion does not work.
Recommendation 2: Convert your keystore into a pkcs12 if it is not already and then use a web base converter or openssl. Some free web based pkcs12 > Pem/Apache converters found through Google search will give you a zip with all the certificates in their own respective files that you open in notepad and copy and paste into your application. Others will give you one file where you will have to open in notepad and copy and paste the individual certificates (Including the BEGIN and END headers) into their own files or into the application directly. You will see an example below in the Apache conversion.
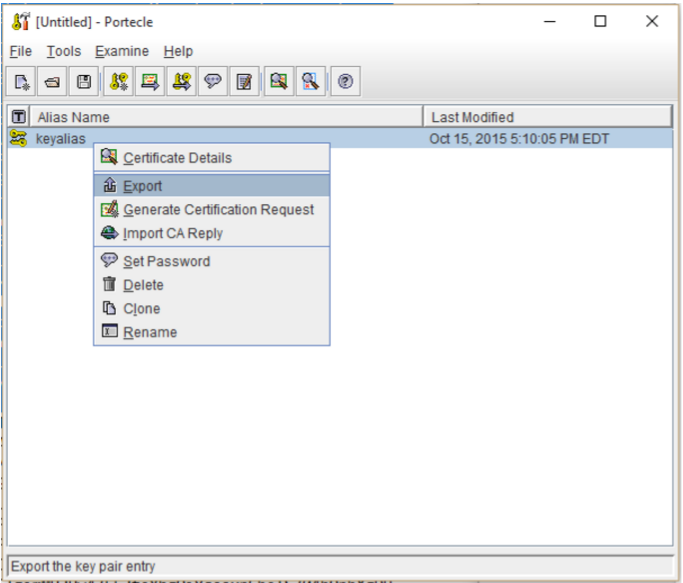
- Right-click on the keystore entry in the keystore entries table. Select the Export item from the resultant pop-up menu.
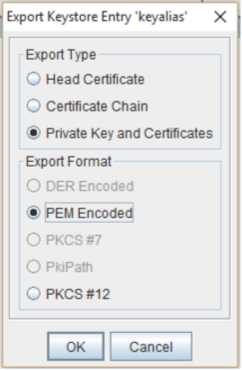
- In the Export Keystore Entry pop up under Export Type select Private Key and Certificates.
Note: The other types will not include the private key which will be required when implementing a SSL Certificate on any Apache type system - Under Export Format select PEM Encoded
- Click OK.
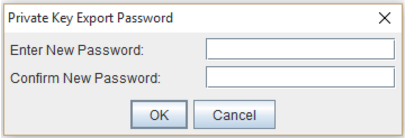
- Under Private Key Export Password Specify a password to associate with your private key. (remember this password it is necessary to
- Click OK.

- Under Private Key Export Password Specify a password to associate with your private key. (remember this password it is necessary to
- Click OK.
- Specify the location and path of where you want to save this Apache file.
- Change the extension of the File Name: from .pem to .txt (this will save you time for later)
- Click Export.
- You will have a text document that looks like this:
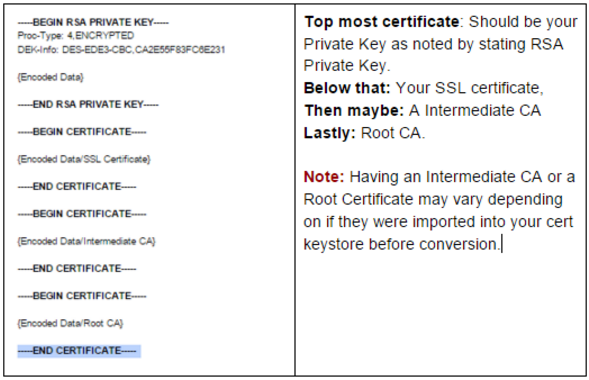
- To help you can see what these individual certificates are by using a online web based certificate decoder by performing a internet search.
Note: Your private key you will not be able to decode because the password associated with it encrypts it. Your SSL certificate will have a common name of your domain such as www.example.com your intermediate will have a common name of something pertaining to the Certificate Authority that issued your SSL certificate. - You will have to Copy and Paste these individual certificates into their own respective notepad files with either a .txt extension or whatever extension your server requires. Apaches typically want either .crt or .pem for its SSL certificate and intermediate files, and .key for the Private key file. . Consult your server documentation. When copying/pasting the individual certificates Included the header and footer and all data within.
Example:
—–BEGIN CERTIFICATE—–
{All Encoded Data}
—–BEGIN CERTIFICATE—– - At the end of this journey you should have at least 2 certificates in their own respective files.
- Private key (important)
- SSL certificate (important)
- Intermediate CA (You may have it provides SSL certificates Chain of trust)
- Root (You may have but isn’t needed typically to be installed on some systems)
- Installation on Apache servers will only require three certificates typically. The Private key, SSL certificate, and IntermediateChain/IntermediateCA. Consult your server documentation.
- The time it took you to work through all this you could of probably just generated a new CSR from your Apache system and performed a reissue of your SSL certificate, giving you a new SSL certificate to be installed within that Apache environment.
Setting a new password for keystore:
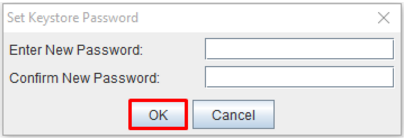
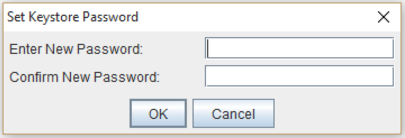
- From the Tools menu, choose Set Keystore Password. Alternatively click on the Set Keystore Password toolbar icon button:

- The Keystore Password box will display. Enter a password for this keystore and click OK.
Conclusion:
This Application also has many other features for you to experiment with. The ones listed in this document are the major ones that would pertain to its main functionality for creation of keystores, Privatekeys, CSR’s, Importing SSL certificate reply’s etc.. Remember to always save your keystore to finalize any configurations you want to take effect.
Portecle is free software; you can redistribute it and/or modify it under the terms of the GNU General Public License as published by the Free Software Foundation; either version 2 of the License, or (at your option) any later version.
Portecle is distributed in the hope that it will be useful, but WITHOUT ANY WARRANTY; without even the implied warranty of MERCHANTABILITY or FITNESS FOR A PARTICULAR PURPOSE. See the GNU_General Public License for more details.
Copyright and Legalities-
Copyright © 2004 Wayne Grant
2004 Mark Majczyk
2004-2015 Ville Skyttä


