Troubleshooting: Tomcat x509 – This Article consists of advanced troubleshooting to a very problematic issue that rarely comes up with versions of keytool when installing an SSL certificate in x509 format.
Issue:
By all normal means when following SSL Installation instructions for Tomcat using X509 you should have a smooth installation, but when importing the Intermediate CA Certificate or SSL Certificate received from the Certificate Authority you may get the following error message still.
“Failed to establish chain from reply”
Cause:
Tomcat/keytool is a picky system.
Tomcat wants to see the entire certificate chain before installation of the SSL Certificate. Typically this can be solved by importing the entire chaining path of your SSL Certificate in the following order: Root > Intermediate > SSL Certificate.
All of these Certificate can be gathered from the CA you purchased your SSL Certificate from.
Yet, you may still get the error message “Failed to establish chain from reply” when importing the Root or Intermediate certificates that you received from the CA. The cause for this phenomenon is unknown.
Resolution:
The following resolution requires a Microsoft OS in order to manually pull the certificate chain from the certificate.
Step 1: Retrieving your Root, Intermediate directly from your SSL certificate:
Note: you must perform this retrieval on a windows system.
- Take your SSL certificate that you picked up following back when following the SSL Installation instructions for Tomcat using X509 it should be in x509 format with a .cer extension. and double click on it.
- At the certificate popup click on Certification Path.
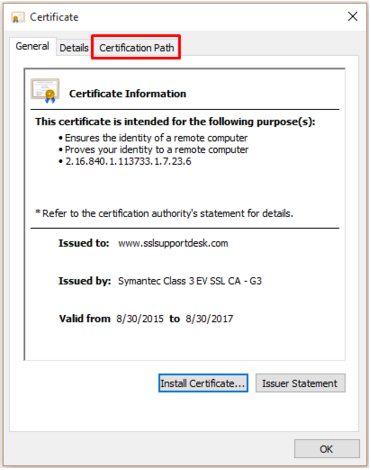
- Under Certification Path you will see a tier of three certificates.
- Double click on the top certificate Root in order to bring up its information.

- Click Details.
- Click Copy to File…
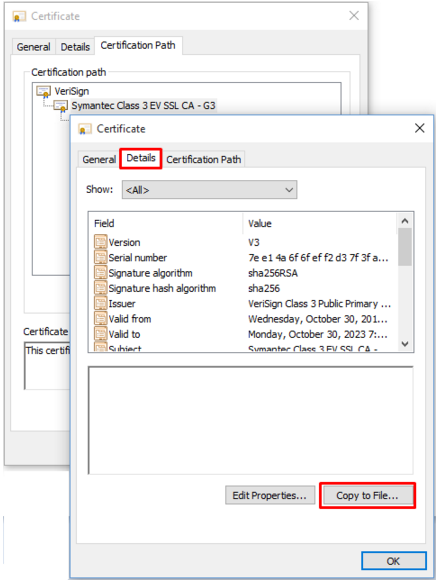
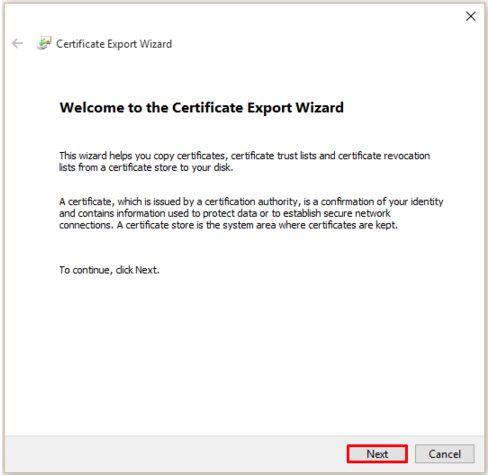
- The Certificate Export Wizard will popup. Click Next.
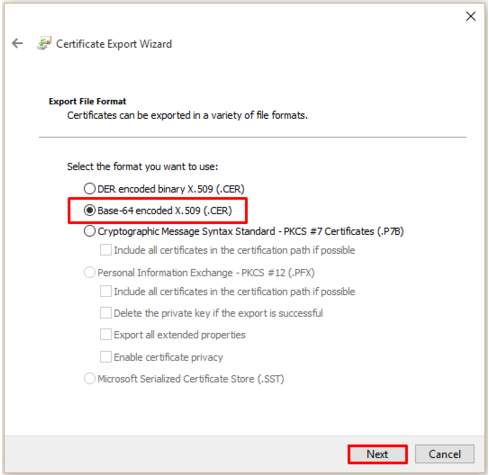
- Select Base-64 encoded X.509 (.cer).
- Click Next.
- On the next screen click Browse and specify the filename and path you want to save your Root certificate. Name it whatever you desire. Example: Root.cer
- Click Save.
- You will be taken back to the previous screen with the location and path of this file specified next to browse. Click Next.
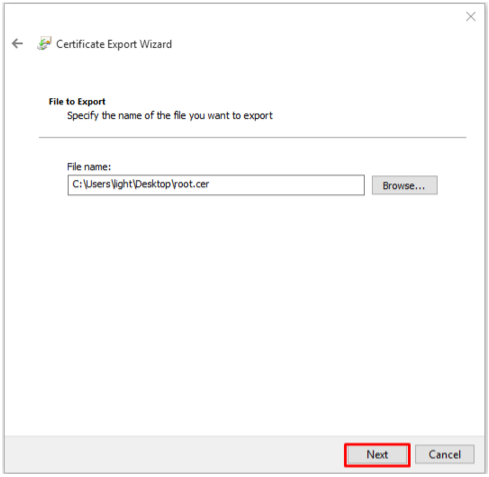
- Complete the export wizard by clicking Finish.
Step 2: Retrieving your Intermediate CA directly from your SSL certificate (Continued):
You will perform the same steps as above in step 1 but with the Middle certificate Intermediate.
- Back to your SSL certificate under the Certification Path tab double click on the Middle Certificate Intermediate in the tier.
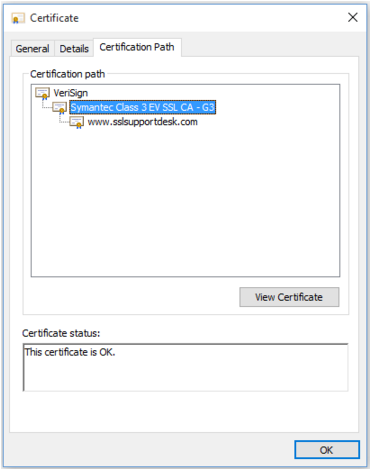
- Click Details.
- Click Copy to File…

- The Certificate Export Wizard will popup. Click Next.

- Select Base-64 encoded X.509 (.cer).
- Click Next.

- On the next screen click Browse and specify the filename and path you want to save your Intermediate certificate. Name it whatever you desire. Example: Intermediate.cer
- Click Save.
- You will be taken back to the previous screen with the location and path of this file specified next to browse. Click Next.
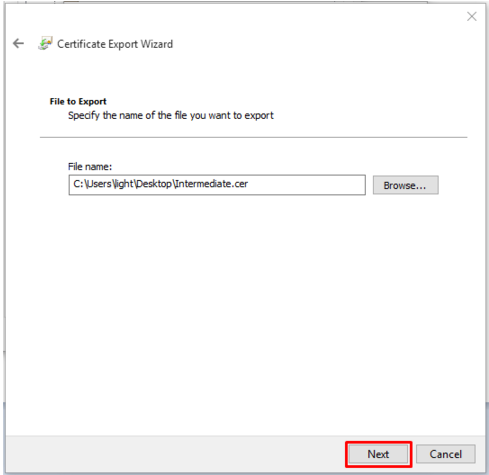
- Complete the export wizard by clicking Finish.
You should now have three files.
- Your Root Certificate.
- Your Intermediate Certificate.
- Your SSL certificate where both the Root, and Intermediate are derived from.
Step 3: Installing your Root CA, CA Intermediate, and your SSL certificate:
It is recommended that you have your Keystore, SSL certificate and Keytool.exe in the same folder or you will need to specify the full file path when running the following commands. you may want to make a copy of your Keystore in case their are issues with Installation.
Note: You will import these files into the same keystore used for CSR creation:
- Import the Root Certificate first. You will specify your own alias for this import Example: Root.
-
keytool -import -alias root -trustcacerts -file root_file_name.cer -keystore your_keystorename.Jks
-
- Import the Intermediate CA certificate second. You will specify your own alias for this import. Example: Intermediate.
-
keytool -import -alias intermediate -trustcacerts -file intermediate_file_name.cer -keystore your_keystorename.Jks
-
- Import the SSL certificate (Use the same alias name based on when you created the keystore for CSR creation)
-
keytool -import -alias your_Privatekey_Alias -trustcacerts -file your_SSLCertificate.cer -keystore your_keystorename.Jks
-
Step 4: Confirm contents of the keystore:
- At the command prompt, enter:
keytool -list -v -keystore your_keystore_filename

- Viewing the contents of the keystore.

The end entity SSL certificate is imported into the alias with the “Entry Type” of PrivateKeyEntry or KeyEntry. If not, import the certificate into the Private Key alias.
NOTE: The Certificate chain length: tells you the keystore was successful in establishing the certificate chain, and your keystore is ready for use.
Step 5: Configuring the Tomcat Server:
Tomcat keeps its configuration information in a server.xml file, which ensures Tomcat is reading the correct keystore file and keystore password.This file also allows server administrators to set the port for secure connections.
If the server.xml file is not configured, or if it is pointing to the wrong keystore, then the server may present the incorrect certificate to the client browser.
Note: Tomcat can be a custom environment. The name of your server.xml file could be something different. You should see some sort of connector within a .xml file under tomcat in the example below. This is what needs to be configured. If you are unable to figure or discover this SSL Connecter you may have to contact Tomcat for Support
- Open the server.xml config file under Tomcat using a text editor (ie. JAKARTA_HOME/conf/server.xml)
- Search for the secure element in your config file (try searching for SSL Connector). By default it should look something like this:
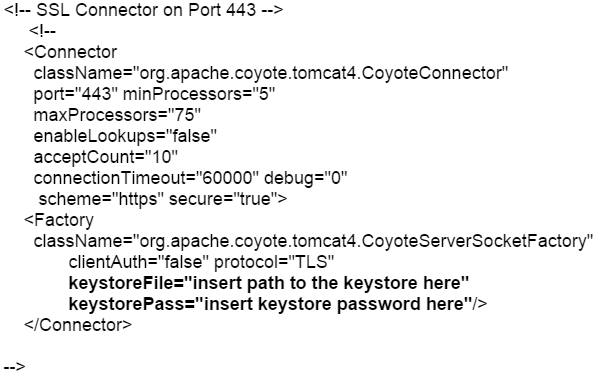
- Make sure to specify the correct “keystoreFile” directive to the new keystore and the “keystorePass” directive is referencing the correct keystore password.
Note: These directives are case-sensitive! Make sure the letters “F” and “P” in “keystoreFile” and “keystorePass” are in uppercase.
Note: If your keystore contains more than one private key alias, please add the “keyAlias” directive to reference the correct private key alias name.
For Example:
keystoreFile=”insert path to the keystore here”
keystorePass=”insert keystore password here”
keyAlias=”insert private key alias here”/>
- Save the changes.
- Stop and start Tomcat
Your SSL certificate is now installed and configured for its website.
These instructions are created out of troubleshooting experience in dealing with the many issues of Tomcat/Keytool. If you are unable to use these instructions for your server, or you are still having issues with Keytool/Tomcat Acmetek recommends that you contact either the vendor of your software or the organization that supports it.
Tomcat Support:
For more information, please refer to Tomcat Support


